An important first step to replacing your legacy alarm with Konnected is to identify and label your wires. Taking the time to do this will ensure that you get things installed correctly.
Important Info
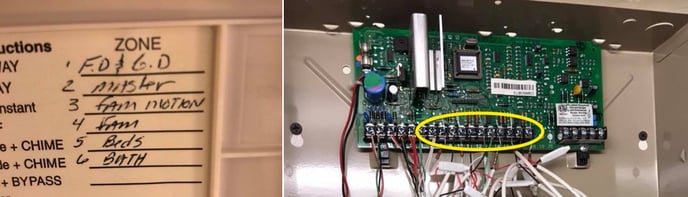
Before you disconnect anything we would encourage you to first take some clear close pictures of your current connections, wiring diagram, and zone lists. This way if there is any confusion after you disconnect things you have a reference.
Second we have included a set of label stickers in your kit. Use them to clearly separate your wires.
You may want to "bench test" your Konnected device(s) before proceeding with wiring by first completing the integration with your chosen Smart Home platform.
If you'd like to do that, please follow the link below for the Smart Home platform you plan on using.
Integrations: Connecting to SmartThings
Integrations: Connecting to Home Assistant
Integrations: Connecting to Hubitat
Integrations: Connecting to Control4
Examine your zone list
Most alarm installers will write down which sensors are connected to which zones. Sometimes zones will only be one sensor. But other sensors (such as doors or windows) might be grouped together. Open/close sensors that are grouped together will be hooked in series.
Wiring Identification
Understanding your alarm system's wiring is crucial when transitioning to a Konnected system. Here's a guide to help you recognize common wire labels:
-
AC +/-: These terminals are connected to a low-voltage AC power source, not standard 120V. Do not connect these to your Konnected board as it could cause damage.
-
Aux +/-: These terminals carry DC voltage and could be used to power your Konnected board or other devices.
-
Bell +/-: These wires are for your alarm siren, which could be either a speaker or a siren.
-
Data: This wire allows communication with your alarm system's keypad.
-
Data com/+ or -/+: These supply power to your keypad.
-
Zones: Your sensors are connected here, typically numbered, and may include a common (com) or negative (neg) terminal. Note that resistors may be present but are not required for Konnected.
-
Telephone: These are generally Cat3 or Cat5 twisted pairs used for emergency calls or to connect to a monitoring service.
-
Ground: This wire is used to ground your system in case of electrical issues.
Before starting your Konnected installation, identify and label your wires. Take detailed photos of the existing setup for reference. Use the provided labels to organize your wires. It's recommended to perform a "bench test" of your Konnected device with your chosen Smart Home platform before full installation. If your zones are documented, review which sensors are connected to them as this will aid in the setup process.
Wire Types
- Contact Sensors: Typically use 2-strand wires for doors and windows.
- Motion Detectors: Usually have 4-strand wires, with two for power (often black and red) and two for the sensor connection.
- Sirens: Often connected with 2-strand wires.
- Keypad: Uses a 4-strand wire, with two for power (commonly black and red) and two for data communication.
- Power: Red and black wires indicate power; AC wires are not to be used with Konnected. A black/red pair may also connect to a backup battery, which is not needed for Konnected.
- Data/Phone: These twisted pairs are for telephone or network communication, using Cat3, Cat5, Cat5e, or Cat6 wiring.
Next Step: Mounting and Positioning