Wiring Your Piezo Buzzer
Connect directly using jumper wires
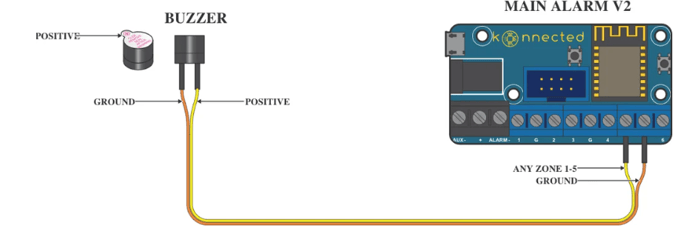
Use the female to female jumper wires to connect the pins on the buzzer directly to the OUT and GND pins on the Konnected Alarm Panel Add-on board and the OUT1 and GND or OUT2 and GND on the Alarm Panel Pro board.


You can also connect the buzzer to the OUT screw terminal, or any zone 1 - 5 on ANY Konnected (Main Alarm, Add-on, or Pro) board using male to female jumper wires.

Use keypad wiring to install buzzer in other parts of the house
Use two wires from your old keypad wiring to connect the buzzer in another part of the house. Keypads usually have four wires: black, red and two other colors. After disconnecting and removing the keypad from the wall, connect two of the wires to the piezo buzzer using jumper wires or terminal blocks. Back at the alarm panel, connect the two wires to an OUT or zone 1 - 5 and G, making sure that the wire going to the + side of the buzzer is the wire going to the output zone.
Recommended Settings
In the Konnected Cloud set the buzzer up as a Momentary Switch. In the older Konnected Smartapp setup set the buzzer as a blink/beep. A more pleasant setting is to set the buzzer with a Duration of 24ms, Pause of 54ms, and a Repeat of 6.
Making it buzz when a door opens
In SmartThings: Use an Automation to make it beep when a door or window opens. You can set the number, and time of the buzzer in the Konnected Mobile app.
Next Step: Wiring Smoke Detectors