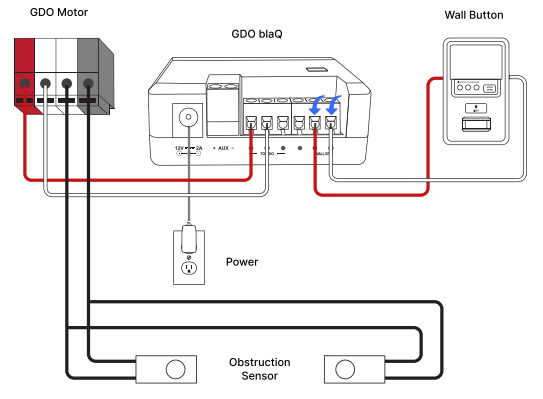
Option 1: Near the Garage Opener Motor
The simplest GDO blaQ installation requires connecting only one pair of red and white wires from the GDO blaQ to the garage opener motor.
Leave all existing wires in place and insert one end of the red and white wire into red and white terminals on back of the garage opener motor. Insert the other ends into the red and white terminals labeled TO GDO on the Konnected device.
Secure the wire out of the way of the path of the moving garage door and mount the device using the included mounting screws or command strips.
You can mount the GDO blaQ:
- On the wall or ceiling
- On the side of the garage opener motor itself (using the included command strips)
- On the supports or beams holding the garage opener motor
Make sure that the warning LED bar is visible from within the garage when mounted.
Option 2: Near the Wall Button
You can also mount the GDO blaQ on the wall near the wall button. Simply connect the red and white wires from the similarly marked terminals on the back of the wall button to the red and white terminals marked WALL BTN on the GDO blaQ.
Leave the existing wires from the wall button to the garage opener motor in place.
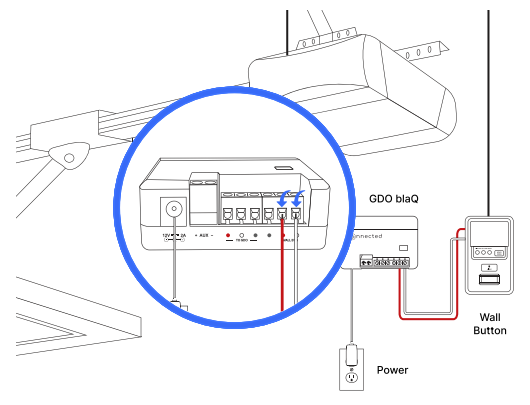
Mount the GDO blaQ on the wall, ensuring that the warning LED bar is visible from within the garage.
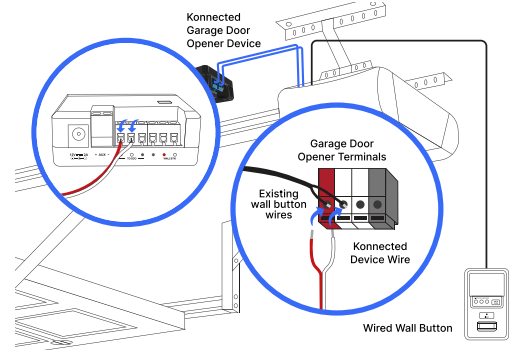
Optional: Pass-thru Wiring
If it’s too difficult to fit the additional wires for the GDO blaQ into the terminals with the existing button wires, the device is equipped with a pass-thru feature to make wiring cleaner.
First, remove the wall button wires from the red and white terminals on the back of the motor unit and reconnect them to the red and white terminals labled WALL BTN on the Konnected device.
Then, connect the new red and white wire in their place, and connect the other ends to the red and white terminals labeled TO GDO. Leave the existing wires for the obstruction sensor beam in place.