This article is designed to guide you through transforming your traditional wired alarm system into a fully integrated smart home-controlled and monitored system with our Conversion Kit. With clear, step-by-step instructions, you'll discover how easy it is to enhance your home's safety and control with our Konnected Alarm Panel Conversion Kit, even if this is your first foray into smart home technology.
Product Information 1
Key Features and Benefits
- User-Friendly Installation: Quickly replace your current system with an intuitive setup process.
- No Installer Code Needed: Simplifies setup by removing the need for specialized access codes.
- Hassle-Free Integration: Seamlessly works with your existing system's sensors and sirens without complex reprogramming.
- Smart Automations: Utilize existing sensors to create intelligent automations for enhanced security and convenience.
- Scalable Design: Modular system that grows with your home’s security needs, allowing for limitless expansion.
- Access for Everyone: Grant system access to unlimited users, making it easy for all household members to monitor and control the system.
Important Information
- Keypad Compatibility: Traditional keypads will be deactivated; consider replacing them with wall-mounted tablets for enhanced functionality.
- Monitoring Services: While traditional professional monitoring is not supported, U.S. customers can opt for Noonlight, a comprehensive Internet-based monitoring service.
What’s in the Box?
Your Konnected Alarm Panel Conversion Kit includes the following items:
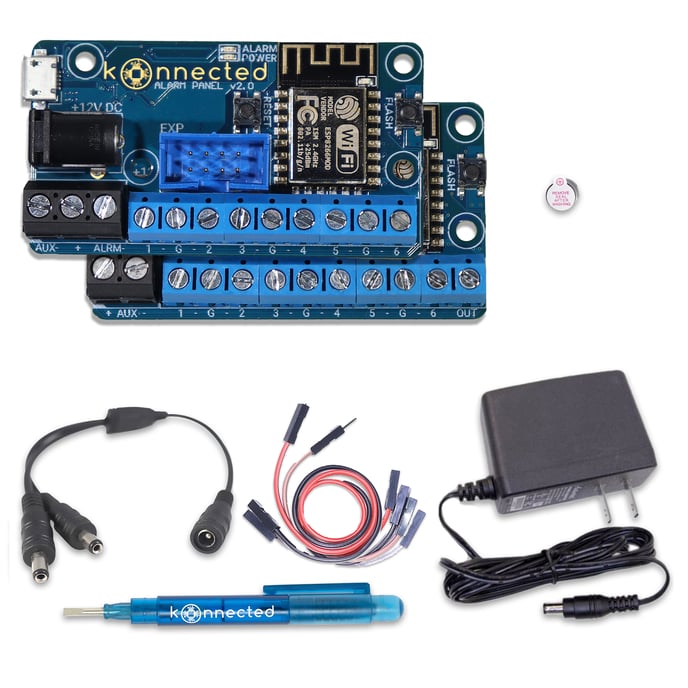
- Alarm Panel(s): Quantity varies with the kit size (photo shows a 12-zone kit)
- Piezo Buzzer: Comes with jumper wires (quantity: 1 for 6, 12, and 18-zone kits, 2 for 24-zone kits)
- 12V Power Adapter: Provides power to the alarm panel
- Power Splitter Cable: Included with 12-zone kits and larger (not part of the 6-zone kit)
- Installation Accessories:
- Konnected window sticker
- Sheet of wire labels for easy identification
- Adhesive-backed standoffs for mounting
- Mini screwdriver pen for assembly
- Welcome card containing instructions and information
Identifying Your Boards
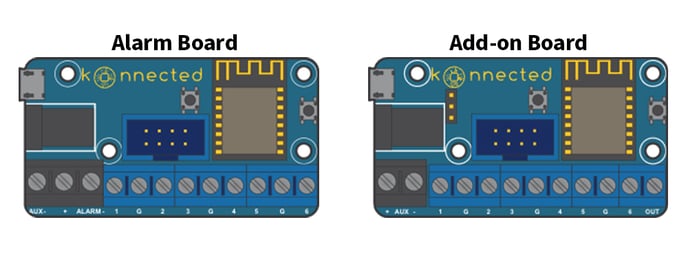 Alarm Panel Board
- Supports up to 6 input zones
- 12V AUX power output for auxiliary devices
- Built-in switched output for directly connecting and controlling a siren or strobe (left in the illustration).
Add-on Board
- Accommodates an additional 6 input zones
- 3.3V signal output to connect a piezo buzzer or relay module
- 5V+ output for powering a 5V relay module or DHT sensor (sold separately, right in the illustration).
Kit Configurations
- 6-Zone Kit: Includes 1 alarm board.
- 12-Zone Kit: Comes with 1 alarm board and 1 add-on board.
- 18-Zone Kit: Contains 1 alarm board and 2 add-on boards.
- 24-Zone Kit: Features 1 alarm board and 3 add-on boards.
- 24+ Zones: Inquire at help@konnected.io
Table of Contents 2
Setup Overview
The following steps provide an overview of the steps involved in the setup of your Konnected Alarm Panel Conversion Kit:
- Connecting to Your Network
-
Connecting to Your Network (for SmartThings users only)
Method #1: Konnected Mobile App (Recommended)
-
- Download: Get the Konnected app for iOS or Android.
- scan the code below for iOS
- scan the code below for android
.png?width=150&height=150&name=adobe-express-qr-code%20(1).png)
- Power one Konnected board (steps will be repeated for additional boards) with the included power supply.
- Launch: Start the app and select 'Add New Device'.
- Wi-Fi Setup: Follow on-screen instructions to enter WiFi details and finalize the setup.
- Confirmation: Look for a non-blinking blue light on the board as a success indicator.
- Multiple Boards: Repeat for each board you have.
-
-
- Identifying Your Wiring
-
Identifying Your Wiring
Proper identification and labelling of your existing wiring are paramount for successfully installing the Konnected Alarm Panel Conversion Kit. Follow these steps to ensure accuracy:
Documentation
- Photograph Your Setup: Capture high-quality images of your current alarm panel, wiring, and any zone lists or diagrams you have.
Labeling
- Use Provided Labels: Apply the included label stickers to each wire, noting their corresponding connections for easy reference.
Wire Identification
- Recognize Wire Types: For a comprehensive guide on wire labels such as AC +/-, Aux +/-, Bell +/-, Data, Zones, and Telephone, please refer to our detailed 📄 Identifying Your Wiring documentation.
- 2-Strand Wires: Typically used for sensors.
- 4-Strand Wires: Commonly connect motion detectors and keypads.
- Red/Black Wires: Usually indicate power connections.
AC Power Caution: Never attach AC power wires directly to the Konnected board.
-
- Mounting and Positioning
-
Mounting and Positioning
Location
- Near Existing Wiring: Install the Konnected Panel, which can easily connect to your wired sensor wires or the original wiring panel.
Enclosure Options
- 3D Printed Enclosure: Consider a tailored enclosure for a secure and neat fit.
- Reuse Metal Enclosure: Alternatively, you may repurpose the enclosure of your old system. We've found that WiFi signal interference from metal enclosures is often insignificant.
Installation
-
- Mounting Options: Secure the device using magnetic or adhesive standoffs.
- WiFi Proximity: Position the panel within a good range of your router to ensure a robust WiFi signal.
- Interference Precautions: Avoid placing the device near high-voltage wiring to minimize potential interference.
-
- Wiring Your Sensors and Sirens:
- Door and Window Sensors
-
Wiring Your Door and Window Sensors
Introduction
When setting up your Konnected Alarm Panel Conversion Kit, it's important to connect your door and window sensors correctly. These instructions will guide you through the process.
Sensor Types
- Normally Closed (NC) Circuits: These sensors are inactive (closed) when the door/window is closed and active (open) when the door/window is opened.
Connection Steps
- Zone and Ground: Attach each sensor's two wires to a zone and the ground (GND) terminal on the Konnected board.
- Serial Connection: For multiple sensors in a series, link an end-of-line resistor between the last sensor and the return wire to the panel.
Important Notes
- All Doors and Windows: Verify they are closed before testing your setup.
- Avoid AC Power: Do not connect any AC power wires to the Konnected board.
- Bench Test: It's recommended to test the setup with your smart home platform before final installation.
-
- Door and Window Sensors
-
- Motion Sensors
-
Wiring Your Motion Sensors
To integrate motion sensors with the Konnected Alarm Panel Conversion Kit, follow these instructions carefully:
Connections
- Power Connection:
- Red Wire: Connect from the sensor to the AUX+ terminal on the Konnected board.
- Black Wire: Connect to the AUX-.
- Signal Connection:
- One Wire: From the sensor’s alarm circuit, attach to a zone terminal on the Konnected board.
- Second Wire: Attach to the GND terminal.
- For Multiple Sensors:
- Each motion sensor requires a separate zone terminal.
- Power Connection:
-
- Motion Sensors
-
- Sirens/Strobes
-
Wiring Your Siren
Connect your siren to the Konnected Alarm Panel Conversion Kit with these steps for a secure and functional setup:
Connection Guide
- Positive Terminal: Attach the siren's positive (red) wire to the 'OUT' terminal on your Konnected board.
- Negative Terminal: Connect the siren's negative (black) wire to the 'GND' terminal.
Power Specifications
- Ensure the siren's power rating does not exceed 2A (ampere) and 20W (watt).
- For 12V sirens: These can be powered directly from the board without additional power sources.
-
- Sirens/Strobes
-
- Piezo Buzzer
-
Wiring Your Piezo Buzzer
Connect a piezo buzzer to your Konnected Alarm Panel Pro Conversion Kit efficiently by following these instructions:
- Dedicated Output: Utilize the dedicated output on the Pro board for the piezo buzzer connection.
- Output Zones: You may connect the buzzer to any of the zones 1-5 on the alarm panel board as these can function as outputs.
Wiring Steps
- Positive Wire: Attach the positive wire of the buzzer to the 'OUT' terminal.
- Negative Wire: Connect the negative wire to the 'GND' terminal.
-
- Piezo Buzzer
-
- Smoke and Carbon Monoxide Detectors
-
PLEASE SEE DETAILED GUIDE VIA THE LINK ABOVE FOR SMOKE AND CARBON MONOXIDE DETECTOR WIRING INFORMATION
-
- Smoke and Carbon Monoxide Detectors
-
- Glass Break Sensors
-
Wiring Glass Break Sensors
Ensure the safety of your premises by correctly wiring glass break sensors to the Konnected Alarm Panel Conversion Kit.
Wiring Steps
- Zone Connection: Attach the glass break sensor's wires to any available zone on the Konnected board.
- Circuit Behavior: Understand that most glass break sensors operate on a Normally Closed (NC) circuit, which will open in response to the sound of breaking glass.
Power Supply
- Power the sensor using the AUX power terminals on the Konnected board, according to the sensor's specifications.
-
- Glass Break Sensors
-
- Relay
-
Wiring a Relay
Integrate relays with your Konnected Alarm Panel to add smart control to household devices like sprinkler systems or garage door openers.
Steps for Connection
- Attach 5V Power: Connect the 5V pin from the add-on or Pro board to the relay's VCC or DC+.
- Ground Connection: Link the GND pin on the board to the GND or DC- on the relay.
- Output Signal: For the relay's input, connect the OUT pin to IN on the relay.
- High-Power Devices: For devices requiring 12V, such as alarms or lights, utilize the ALARM +/- terminals on the main board.
Configuration Tips
- Ensure most Konnected relays are set to 'low-trigger' for compatibility with your smart home app settings.
-
- Relay
- Powering Your Konnected Board
-
Powering Your Konnected Board
Choose from multiple power supply options to ensure your Konnected Alarm Panel operates efficiently.
Powering Options
- Existing Alarm System: Utilize the 12V DC power from your previous alarm system's power supply.
- Board Specifications: The board is compatible with a range of 6V to 24V DC or 5V via USB.
- Included Power Adapter: Plug the included power adapter into a standard outlet for a simple setup.
- USB Powering: While USB is an option for board power, it won't support high-draw devices like sensors or sirens.
- Multiple Boards: Utilize a splitter cable if you're setting up multiple boards.
- Reusing Wiring: If repurposing existing wiring, first ensure to disconnect the old system's power and battery.
-
- Choosing Your Smart Home Platform
- PLEASE SEE DETAILED GUIDE VIA THE LINK ABOVE FOR SMOKE AND CARBON MONOXIDE DETECTOR WIRING INFORMATION
- PLEASE SEE DETAILED GUIDE VIA THE LINK ABOVE FOR SMOKE AND CARBON MONOXIDE DETECTOR WIRING INFORMATION
After the initial setup, you'll be able to seek support and join the Konnected community for additional help and inspiration.
Support and Resources
Should you encounter any issues, reach out for support:
- Submit a ticket or email us at help@konnected.io.
- Join our community forums for questions, support from other users, and inspiration.