Konnected's GDO White (v1 and v2) works seamlessly with Hubitat! Our newest Hubitat integration is 100% local and leverages our new ESPHome-based firmware for an ultra-fast local connection to your Hubitat hub.
This guide will help you install your Konnected Garage Door Opener with Hubitat for the first time.
We recommend performing these steps before mounting and physically installing the device in the garage.
Made for ESPHome Firmware
Konnected's GDO White comes pre-loaded with our newest firmware platform built with ESPHome. This is the preferred firmware for integrating with Hubitat using Konnected's officially supported drivers.
If you're re-installing an older device that is not already running the latest firmware, then:
➡️ Go to install.konnected.io/garage-door-opener and select the Made for ESPHome firmware to update the firmware in 2 minutes.
Read more: ESPHome with Konnected Garage Door Opener
Connect to WiFi
- Plug in the device using the included power adapter.
- Using a computer or mobile phone, look for an open WiFi network named konnected-xxxxxx and connect to it.
- A captive portal page should appear, with a list of nearby WiFi networks. If this does not automatically pop-up, then go to http://192.168.4.1 in your browser. Click/tap on your WiFi network, enter your WiFi password, and click Save.
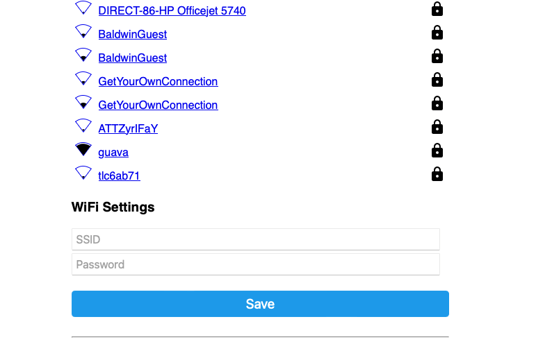
- The device should now be connected to your home WiFi.
Install the Hubitat Driver Bundle for the GDO White
Konnected's GDO White driver for Hubitat can be installed in a few clicks by uploading our packaged driver bundle.
1. Download the latest Bundle
Go to the latest releases of konnected-hubitat on GitHub, and download the bundle zip file for your product:
- GarageDoorOpenerGDOv2S.zip for the GDO White v2(sold in 2024 and later)
- GarageDoorOpenerGDOv1S.zip for the GDO White v1 (sold in 2023)
2. Install the Bundle in Hubitat
Log in to your Hubitat hub, go to For Developers > Bundles > Import .ZIP to upload the bundle. Or, you can copy the link to the bundle ZIP from GitHub and import it into Hubitat without downloading it first.
Alternate method: Use HPM (Hubitat Package Manager)
Hubitat Package Manager makes installing and maintaining 3rd-party Hubitat drivers easy. To install the Konnected GDO White driver from Hubitat Package Manager open HPM from the Apps section in Hubitat and select Install. Then, search keywords for Konnected. Select the driver for your product version and follow the on-screen steps to install it.
Alternate method: Install Libraries and Drivers manually
Konnected's Hubitat integrations are open source and available on GitHub: konnected-io/konnected-hubitat. Also requires ESPHome-API-Library to be added to the Libraries section in Hubitat.
Create a Virtual Device
ESPHome devices are not automatically discovered in Hubitat. To add the device, follow these steps to create a virtual device:
- In Hubitat, go to Devices > Add device. Then choose Virtual.
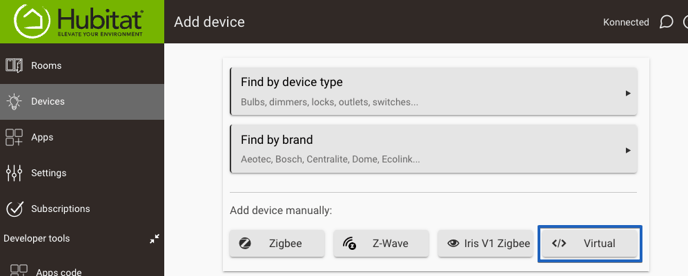
- Fill in a Device Name. The Device Network Id should be auto-populated for you. Select Konnected Garage Door [MODEL] from the Type drop-down. It will appear at the bottom of the drop-down under the User heading.
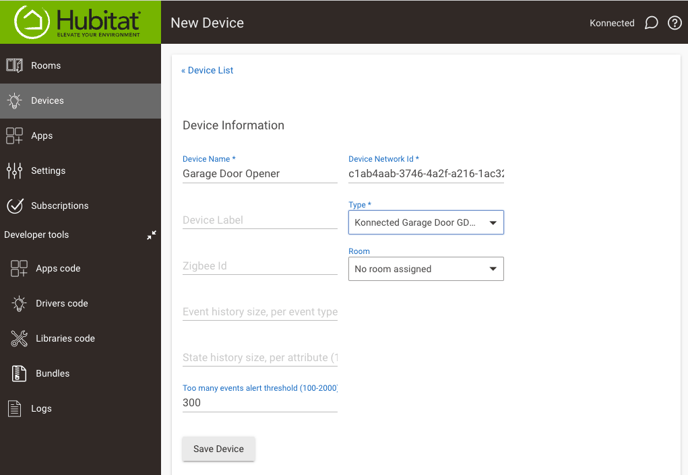
- Find the IP Address of the device on your local network. You find this by looking in your router's app or status page and looking for a device named konnected-XXXXX. Enter the IP address in the device's Preferences section and Save Preferences.
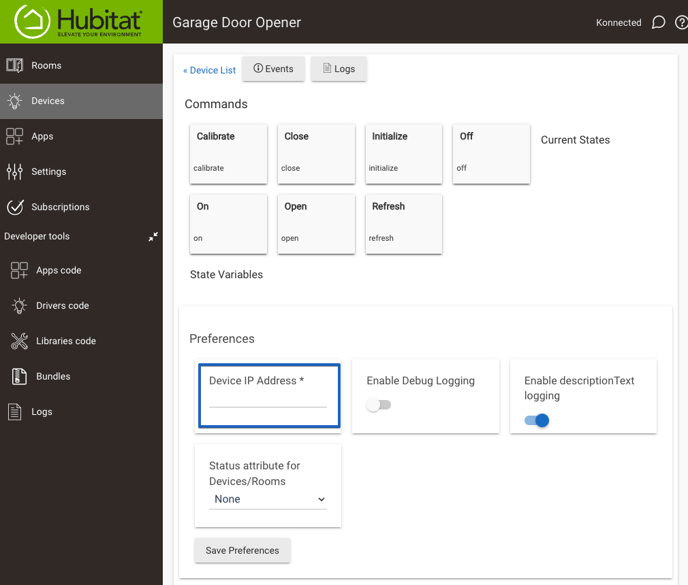
- After saving the IP Address, Hubitat will connect to your device and automatically populate states! Your Garage Door Opener is ready to install and use.